
Love candles but tired of spending a lot of time in stores finding the most relevant to make your home into heaven of tranquility? But now you can make your own scented candles at home according to your mood in just 10 easy steps. With just a few basic materials and your favorite fragrances, you can craft unique candles that reflect your personality and style.
In this blog, we’ll explore the simple steps to pour, scent, and decorate your own candles—all from the comfort of your kitchen. We will talk about the whole process of making scented candles at home step by step, including wax, adding color, and fragrances.
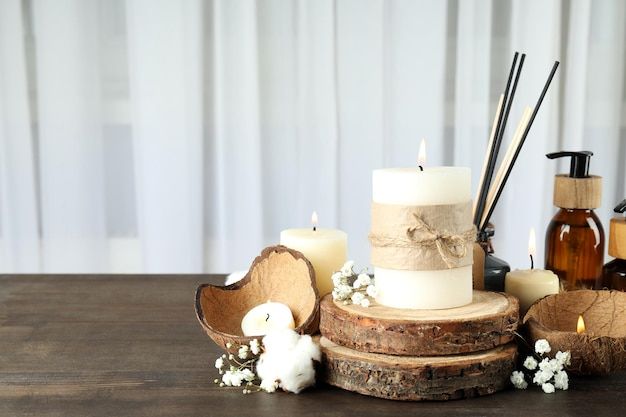
Scented Candle Making Essentials
In order to make scented candles you need just a few simple ingredients and some supplies you probably already have in your house.
Wax
The heart of every candle. Choose from:
- Soy wax – eco-friendly and clean burning.
- Paraffin wax – affordable and gives a strong scent throw.
- Beeswax – natural and long-lasting.
- Coconut or palm wax – smooth texture and lovely finish.
Wicks
Wicks control how your candle burns. Options include:
- Cotton wicks for standard candles.
- Wooden wicks for a crackling effect.
- Hemp or linen wicks for natural alternatives.
Containers or Molds
These hold the wax and shape your candle. Try:
- Glass jars, tins, or ceramic cups for container candles.
- Silicone or metal molds for shaped or pillar candles.
Fragrance Oils or Essential Oils
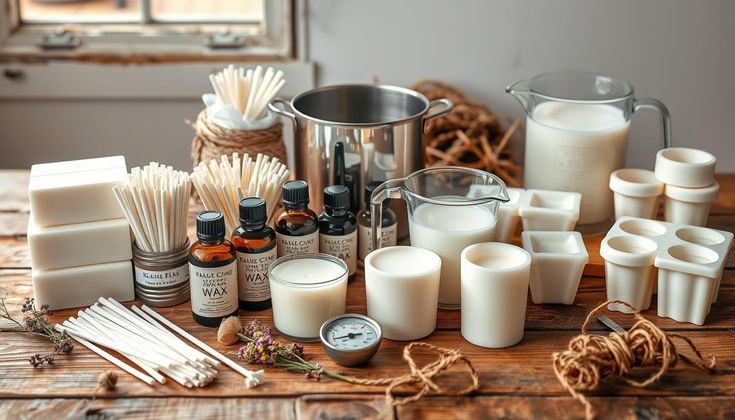
Double boiler
Thermometer
Candle wick trimmer
How to make scented candle at home?
Step 1. Prepare Your Container
Step 2: Measure the Wax
Step 3: Melt the Wax
Step 4: Add Color
Step 5: Cool the wax slightly
Step 6: Add Fragrance oil
Step 7: Secure the wax
Step 8: Pour the Wax
Step 9: Let it cool & set the wax
Step 10: Trim the wick & cure the scented candle.
Creating candles at home is simpler than you might think. With a few specialized items, some planning, and a little time, you can craft beautiful, fragrant candles. Follow this step-by-step guide to start your candle-making journey.
Prepare Your Container
- Wash and dry your jar or tin so that no dust or oil residue.
- Stick the wick in the center of the container using a drop of hot glue or a bit of melted wax.
- Make sure it stands upright — you can wrap the top around a pencil or chopstick placed across the rim to keep it centered.
Measure Your Wax
- To estimate the right amount, fill your container twice with solid wax flakes.
When melted, wax volume reduces to about half, so this gives you just the right amount.
Melt the Wax
- Set up your double boiler: Fill a pot halfway with water and place a heatproof bowl or jug on top.
- Pour your measured wax into your double boiler and warm it slowly until completely melted. Stir carefully with a spatula, catching any bits that rise up the pot’s edges
- Different waxes have different melting points:
- Paraffin wax: around 38°C (100°F)
- Soy wax: approximately 51°C (124°F)
- Beeswax: around 63°C (145°F)
Add Color
- When your wax is at temperature, drop in the coloring bricks and stir until they are firmly melted.
- Stir until it’s evenly blended — remember, the color looks darker in liquid form but lighter once cooled.
Cool the Wax Slightly
- Remove the wax from heat and let it cool for a few minutes.
- Ideal temperature for adding fragrance:
- Soy wax: 70–80°C (160–175°F)
- Beeswax: 80–85°C (175–185°F)
- Paraffin: 65–75°C (150–165°F)
Add Fragrance Oil
- The strength of the scent depends on the type of wax you use, the temperature at which you add the fragrance, and how much fragrance oil you add.
- Most candle makers follow a general guideline of 6% to 10% fragrance oil to wax weight.
- Paraffin wax has the best scent throw. It can usually hold up to 10% fragrance oil,
- Soy wax has a decent scent throw, it holds 6% to 10% range and pour the fragrance in at the right temperature.
- Beeswax, with its higher melting point supports up to 6% fragrance oil.
Secure the Wick
- Center one wick in each container.
- Secure it to the bottom with a drop of melted wax or glue.
- To keep your wick centered, use a wick holder or a clothespin across the top of the container to secure it in place while the wax cools.
Pour the Wax
- Pour the wax slowly into your container to avoid bubbles.
- If your candle cools unevenly or forms a sinkhole, try reheating the surface with a heat gun or a hairdryer on a low setting.
- Leave about 1 cm space at the top.
- Hold the wick in place as you pour so it doesn’t move off-center.
Let It Cool & Set
- Let your candle cool at room temperature for at least 4–6 hours, or overnight for best results.
- Avoid moving it during this time — any disturbance can cause cracks or uneven tops.
- If a sinkhole forms in the center, melt a small amount of leftover wax and pour it over to fill the gap.
Trim the Wick & Cure the Scented Candle
- Once the wax has hardened, trim the wick to ¼ inch (0.5 cm).
- Curing times vary by wax type:
- Paraffin wax candles: cure in about two days
- Soy candles: harden in about four hours, fully cure in three to four days
- Beeswax candles: take up to 10 days to cure completely.
TIPS & TRICKS
Scent Combinations
Mood | Blend | Notes |
Relaxing | Lavender + Vanilla | Spa-like and calming |
Refreshing | Lemon + Mint | Uplifting and clean |
Cozy | Cinnamon + Orange + Clove | Warm, spicy |
Floral | Rose + Jasmine + Sandalwood | Romantic |
Earthy | Cedarwood + Patchouli | Grounding and rich |
Festive | Pine + Cinnamon + Apple | Perfect for holidays |
CONCLUSION
Making a scented candle at home in just 10 easy steps is a fun and rewarding way to add warmth and relaxation to your space. With the right blend of wax, fragrance, and creativity, you can craft personalized candles that suit your mood and style. Beyond their beauty, scented candles play a key role in aromatherapy, helping to relieve stress, boost focus, and create a calming atmosphere. Whether you’re making them for yourself or as thoughtful handmade gifts, each candle becomes a unique expression of comfort and care. So, gather your materials, follow these simple steps, and enjoy the soothing benefits of DIY scented candles in your daily aromatherapy routine.
[url=https://rhsolutions1.in]Купить пластиковые окна на заказ в Москве[/url] — это отличный способ улучшить энергоэффективность вашего дома и повысить его комфорт.
Вы можете легко оставить заявку на производство пластиковых окон.
[url=https://rhsolutions1.in]Купить пластиковые окна на заказ в Москве[/url] — это отличный способ улучшить энергоэффективность вашего дома и повысить его комфорт.
Приобретение пластиковых окон на заказ в Москве позволяет добиться отличного качества.
франшиза магазина фиксированных цен One Price [url=https://oneprice.shop/]франшиза магазина фиксированных цен One Price[/url].
https://google.net/url?q=http://oneprice.shop
trusted medical marijuana online shop with safe access
При планировании поездку на Тенерифе, определённо стоит посетить Monkey Park Tenerife и бассейны Martianez, а также не забудьте про знаменитое Драконово дерево и пляж Тереситас — чудесные места для отпуска и фото. Для транспортировки по острову оптимально использовать bus Tenerife, а время отправления и маршруты, включая ligne de bus Tenerife sud, можно посмотреть здесь [url=https://ispaniagid4.ru]испания города у моря[/url] .
Кроме Тенерифе, достойны внимания и другие канарские острова, допустим, Ла Пальма или Иерро, а также рекомендуется изучить карту Канарских островов, чтобы подготовить свой маршрут. Если обожаете Испанию, предлагаю также обратить внимание на города у моря, подобные Малага, Гранада и Барселона с её пляжами и парком Цитадель. Атмосфера на Тенерифе в ноябре и марте как правило приятная, так что поездка будет удобной.
Когда планируете отпуск в Италию, настоятельно советую уделить внимание на агротуризм в Тоскане – это превосходный способ познать пейзажами и местной итальянской кухней. В особенности привлекателен агротуризм Италия Тоскана, где можно съездить на фермах, попробовать вино и посетить термы Тоскана. Для ценителей активного туризма будет уместен маршрут по Доломитовым Альпам на машине или автопутешествие по амальфитанскому побережью на машине, а если планируете культурного досуга, не обойдите вниманием маршрут по Венеции за 1 день с полной картой на сайте [url=https://holidaygid3.ru/]флоренция за один день[/url] .
Кроме того, для энтузиастов шопинга Флоренция дарит прекрасные аутлеты во Флоренции, в том числе The Mall – о них обычно благоприятные отзывы. Если решили посетить Венецию, следует знать тариф гондолы в Венеции и как попасть до интересных объектов, в частности, таких как Святой лестницы или исторических форумов в Риме. А если едете с детьми, есть большое количество вариантов, которые идеально подойдут для совместного отдыха, скажем, экскурсии из Неаполя в Помпеи или путешествие на паром из Неаполя на Капри.
Когда вы планируете путь из Неаполя в Сорренто, нужно учесть не только расстояние между городами, но и удобство паромного сообщения — допустим, паром из Неаполя на Капри может явиться отличным дополнением к поездке. Обязательно заходите в Национальный римский музей и Палатин, чтобы детальнее понять исторический контекст античного Рима, а также не обойдите площадь Венеции и площадь Капитолия, которые изумляют своей архитектурой и настроением. Больше информации о сочетании достопримечательностей и маршрутах можно увидеть тут: [url=https://holidaygid4.ru]пеший маршрут по венеции на 1 день[/url] .
Для людей, кто располагает одним днём в Венеции, прекрасный вариант — пеший план, тянущийся через основные места и каналы, охватывая площадь в Венеции и плавание на гондоле. Также предлагаю обратить внимание на варианты экскурсии по Флоренции и прогулки по форуму Романум, а если намечаете активный отдых, трек по Тре Чиме ди Лаваредо принесет незабываемые воспоминания. В связке с краткой поездкой в Помпеи и Везувий это замечательный способ посмотреть максимум за короткое время.
Когда планируете поездку в Потсдам и думаете, что посмотреть за один день, предлагаю открыть маршрут с посещения знаменитого дворца Сан-Суси и Голландского квартала — тут прекрасно сочетается историческая атмосфера и теплая атмосфера. Кроме того стоит заглянуть на японский сад и крепость Кёнигштайн, а для любителей природы — парки Германии, которые удивляют своей эстетикой и ухоженностью.
Для тех, кто путешествует через Дюссельдорф, рекомендуем заскочить на барахолку или блошку (координаты легко узнать), где можно найти примечательные вещи и узнать с местной культурой. Если привлекают аттракционы, определенно посетите Фантазия Ленд — тарифы на билеты и часы работы проверяйте на их сайте [url=https://holidaygid5.ru]фантазия ленд[/url] . Берлин тоже полон замками и музеями, которые великолепно дополнят ваше путешествие.
Когда планируете отдых на озере Шира, важно заранее побеспокоиться о вариантах размещения. Туристические базы на Шира дают разные варианты — от недорогих домиков до более удобных комплексов с бассейном. В качестве примера, база отдыха Шира Жемчужный известна уютными шира домиками и прекрасными условиями для семейного отдыха. Для тех, кто разыскивает жилье рядом с природой и любопытными местами, удачным ориентиром могут стать базы отдыха Шира с бассейном или базы 3 звезды Шира, а также уникальный сад камней Шира, который следует непременно посетить. Подробнее можно изучить на [url=https://rafoto.ru/]база отдыха шира жемчужный[/url] .
Если на первом месте цена и комфортное расположение, то база отдыха Жемчужный Шира окажется отличным выбором — здесь нередко можно найти предложения шира жемчужный снять домик по справедливой цене. Энтузиасты каякинга и водных развлечений безусловно оценят катекс Шира и бегущую по волнам Ширу как фрагмент активного озеро Шира отдых. Следовательно, если планируете шира отдых, важно тщательно отобрать базу отдыха на Шира и загодя бронировать жильё, чтобы устроить комфортное и незабываемое время.
Планируя отпуск в Таиланд, значительная часть задаются вопросом — Пхукет или Самуи? Данные острова популярны своими фантастическими пляжами, и если занимают пляжи Самуи, нужно посмотреть карту, чтобы отобрать именно тот берег, который вам по душе. Для тех, кто тревожится о безопасности, непременно стоит просмотреть информацию о цунами в Тайланде 2004, тем более если речь идет о Пхукете — там есть множество фото и отзывов о возобновлении после трагедии.
Дополнительно, стоит продумать экономическую сторону — сколько денег закладывать на Пхукет или Тайланд всего на 10 дней, а также уточнить про обмен валюты на Пхукете, получение в аренду байка и приблизительную стоимость массажа. Есть достаточно полезных отзывов по таким темам, в том числе, на сайте [url=https://thaiescape.ru]цунами в тайланде 2004[/url] , где можно обнаружить отзывы о дайвинге, океанариуме на Пхукете и самых восхитительных пляжах Самуи. Следует ознакомиться с правилами въезда в Таиланд 2025 и что предпочтительнее брать с собой, чтобы отдых вышел максимально комфортно.
Продумывая поездку в Таиланд, многие путешественники озадачены вопросом, сколько стоит путёвка в Тайланд и сколько запастись денег на отдых. Допустим, путёвка в Тайланд стоимость определяется сезона — разумнее ехать в Тайланд, Пхукет в время с ноября по февраль, когда температура самая оптимальная. На Пхукете советую изучить с рынком Патонг и шопинг-центрами на Патонге, где можно не только купить сувениры, но и продегустировать необычные фрукты Таиланда. Детальнее про стоимость, программы и трансферы, а также паром Пхукет Самуи, можно посмотреть здесь [url=https://bangkokescape.ru]массажные салоны пхукет[/url] .
По поводу ориентирования, в аэропорту Пхукета дело довольно легко: основная среди главных задач — подобрать самый лучший обменник на Пхукете или надёжное такси до отеля. За полторы недели на Пхукете обычно предлагают взять с собой количество денег, составляющую ориентировочно 30-40 тысяч бат, чтобы комфортно погасить наём байка, массажи и расходы на еду. Если интересно, что выбрать — Самуи или Пхукет, то каждый из курорт хорош по-своему, и всё основывается на ваших вкусов, скажем, особенности пляжей или экскурсионные маршруты.
If you’re trying to identify “what season am I” in terms of seasonal color analysis, leading off with your skin tone and undertone is essential. For example, a deep summer color palette operates great for those with an olive skin tone or yellow undertone skin, uniting cool and muted shades that flatter colors like deep blues and soft roses. Aids like the colour analysis app or an online quiz can simplify this process, providing insights into skin tone charts and vein test undertones to help find your best colors, whether it’s the soft summer color palette, deep winter color palette, or light spring color palette. For a practical guide, check out [url=https://coloranalysisfree.org]seasonal color analysis[/url] to review palettes and analysis tips tailored for various skin tones such as amber skin tone, pale skin, or warm beige skin tone.
It’s also beneficial to consider certified options like color analysis pro for a more thorough breakdown; though some users explore how to cancel subscription plans if they want to evaluate the service before pledging. Whether you’re eager about the best colors for pale skin or want to find the right clothing colors for yellow skin tone females, understanding your seasonal color palette can really elevate your wardrobe choices. Free color analysis tools, apps, and quizzes deliver a great launch pad to explore skin color types and discover flattering hues that go with your natural coloring, from deep summer celebrities to those with reddish undertone skin.